Sunday, May 6, 2012

The Rast Hack

For awhile now, we've been planning/working on a hack for a fairly unremarkable ikea dresser, the Rast. The Rast is an unfinished pine three drawer dresser. But for $35, I was sure we could make something beautiful with such a nice plain canvas. I wanted to incorporate the wood-burning technique that I used in a previous mini-project of mine, the rustic stool. So after picking up our plain-jane dresser, we first used a propane torch to burn the wood. This essentially reverses the grain, with the wood grain remaining somewhat light while turning the solid spaces a dark black.

We then sanded the excess char off the pieces and then added two coats of a high-gloss polyurethane stain combo in a nice red-brown color, making sure to sand between coats.


We then used a semi-gloss white paint and painted the front of the dresser drawers a bright white in order to tie into the modern white furniture in our main living space. I threw out the included wood knobs (man, they were ugly!) and instead found these lovely knobs at the affordable price of $1 each
So using some elbow grease and ingenuity, Isaac and I were able to take this
And turn it into this


All in all, I am very pleased about how the project turned out. The pictures hardly do it justice, but it looks like a piece from a high-end boutique. This will serve to hide all of our craft items that currently sit in big Rubbermaid containers in our front room. Sometime in the near future, I intend on purchasing a mate for this lonely piece and repeating the process.

Monday, April 30, 2012

Dining Room/Craft Area

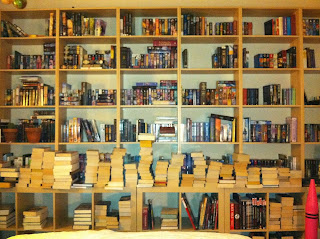
With finals upon me, I haven't had nearly enough time to put finishing touches on some of the in-progress projects I'm working on. I still have a fabulous dresser hack  that I've been working on (just waiting for the knobs I ordered online to arrive) and the finishing touches/organizing of the books on our new bookshelves.
Having finished the bookshelves, our next big task is to organize the craft area/dining area. This area is a challenge due to the fact that it needs to function for virtually everything. It needs to work for crafts, eating, working, storage and pet area. Whew! How to get all of this in a 9' x 7' space? My intention with this area has several components:
  1. Finish making the dresser we've already started. Then get our butts down to our home-mecca, Ikea, to get another dresser and hack in the same fashion. We'll use these to contain all our art supplies and thereby get rid of the hideous Rubbermaid storage drawers that are currently there.
  2. Get rid of the two small book shelves that are currently in the space. Right now they're filled with old magazines and trapper-keepers and just make the whole area look visually cluttered. Anything worth keeping on the shelves move over to our new shelves (though I suspect most of it will get the boot).
  3. Figure out the kitty litter situation. Ugh. This one is a constant battle for us. We own two 20+ pound cats and have issues with the litter box. They are so large that they literally do not make litter boxes large enough for our cats. Our solution was to simply cut out a door in a 55 gallon plastic storage box. But due to the size of said box, the only option is to keep it in this area. As you might imagine, this is extremely unsightly, and we go through lengths to hide it. Right now, it sits under our unused kitchen table that we have pushed against the wall. I want to build a countertop in the area that can hide the box underneath with curtains and thereby reclaim our neglected table. I could really use a table to sit at to do work/study.
  4. Using the aforementioned countertop, I'd like to build a few shelves above it and use it as a bar area. Our current method of storing liquor on the top of our kitchen cabinets is ok, but having to ask my boyfriend to come get the bottles down for me is inefficient. Plus, I'm proud of the small, high-end scotch collection we have, and I'd like to be able to show it off.
  5. Take back our dining table! I'm very excited about this one, because it really is the entire purpose of getting this area together. My plan is to install wheels on the table so that we can pull out/push aside the table at will, allowing for a more usable multi-functional space. Instead of chairs, I intend to add a bench against the wall to the kitchen, so that I have seating when necessary and can push the table over it & out of the way when I don't.
But our somewhat plain pine table has seen better days and the country design of it doesn't match anything in our house. Since it's intended to become the focal point for the space, it needs something to make it more cohesive. I came across this coffee table hack and found my answer. The dresser hack that we're working on really speaks to this - they have a glossy, stained wood shell with white drawer fronts. So I was thinking of sanding it, then using the same stain/paint combo to tie it together. I'm so excited about the prospect I'm practically foaming at the mouth to try it out! But the idea of hand-sanding the large table isn't very appealing - so I may have to see if I can weasel a friend to loan me a belt sander.

But for now, I'll dream, and get back to studying!

Monday, April 23, 2012

Spotted!

Just a round up of a few amazing pieces I've been dreaming about.

First, this fabulous sofa is not only beautiful, but imagine how perfect it would be for hosting a party. Although in my house, its likely to attract a frustratingly huge amount of crumbs in those dimples. Perhaps it would be better just tufted on the back ?


This succulent table made me think of my lovely sister-from-another-mister, Jesse. She's the succulent whisperer. How cool would that be - you don't even need a table runner. What a neat idea.

Plus I stumbled on this list of 75 DIY projects that is sure to keep my wheels turning for awhile. For now I'm going to focus on getting the books put up and that half-done Rast hack. Hmmm... perhaps I can steal a bit of time off tomorrow...

Our towering bookshelves

One of the more challenging storage issues Isaac and I have is how to store our 1,000 book collection. Originally, we had 6 inexpensive ($20/each) ikea shelves. These were lovingly assembled at the foot of our bed so that we may bask in the glory of our favorite collection. The books overwhelmed the small shelves, making the space somewhat insufficient. Not only that, but the rickety shelves looked lopsided and haphazardly thrown together - partially because of the shelves themselves and partly because of our sloped floor (as we later found out).

Being an Ikea addict, I began thinking of ways to toss the shelves. I wanted to build up, to better utilize our tall ceilings for storage. First I stumbled upon this hack. Here, the owners used some inexpensive shelves stacked upon one another to create a custom, built-in look. I liked the idea of smaller shelves atop larger ones. But crunching the numbers, even this relatively inexpensive hack would cost around $600. Ouch.


So I kept looking into other ideas. Then I stumbled upon another solution. Here, the owner reinforced their cheap shelves by connecting them to one another using hardware. It eliminated the unsightly spacing between each shelf - which was a problem with our current shelves our uneven floors. Lightening struck. By reinforcing and reusing the shelves we already had, we could have our dream floor to ceiling shelves for less than $200. And so the plan was laid out, sketches drawn, and off to Ikea we went.

After a frustrating hour in the parking garage trying to figure out how to fit boxes of shelving into a compact car (*always* a problem when we do a big Ikea shop) we got the necessary items home: 2 2x4 Expedits, and one 2x2 Expedit, all in birch to match the current shelving. 

I was surprised how quickly the Expedits came together - we had all three built in less than an hour. Isaac working away:

Coming together:

After assembling and placing the Expedits, we set about securing the shelves we already had to one another. We punched out the cheap plastic backing on the back, preferring to go with open-back shelving to match the Expedits. We stacked the shelves atop of the sturdy Expedits, and secured them to the wall. Voila!

Before (notice the awful spacing between shelves):
 

And after:

Its a nice view to wake up to, eh? We added about 30 sq ft of book shelving, increasing the height from 6ft to about 10ft. Its definitely a more cohesive, pulled together look. More pictures to come after we finish the tedious re-shelving of our book collection. 

Sunday, April 22, 2012

Welcome to my nest!

Hello friends,

Welcome to my blog. As any of you who know me will attest to, I have an incessant, burning desire to "nest" - that is, to create and recreate my home.

I love my apartment. Seriously. From the high ceilings, the hardwood floors, the huge windows spilling light into our space, whats NOT to love? But my partner Isaac and I are the collecting kind of people. Which is a really nice way of saying we have a lot of stuff. Storage and organization is a never-ending battle for us. So much so that a few months back, we began to look for a two bedroom apartment. After several weeks of viewing apartments that can only be described as being woefully sub-par, we decided we were just going to stay put. We *have to* make this 850 sq ft apartment work.

We began purging. It was (and still is) shocking to see just how much stuff we could get rid of and how much more we still have to go. But twenty 50 gallon trash bags worth of discard later, I've found that by having less, the stuff we keep becomes more meaningful.

The process continues, although the focus is more on organizing what we have left while doing so on a budget. We're also slowly shifting away from the mishmash of hand-me-down furniture that defines the twenty-something apartment and toward a cohesive, clean style. This blog is intended to be the diary of that process, along with whatever hopeful inspiration I come across.

Welcome to our home.